Paleo Pigs in a Blanket

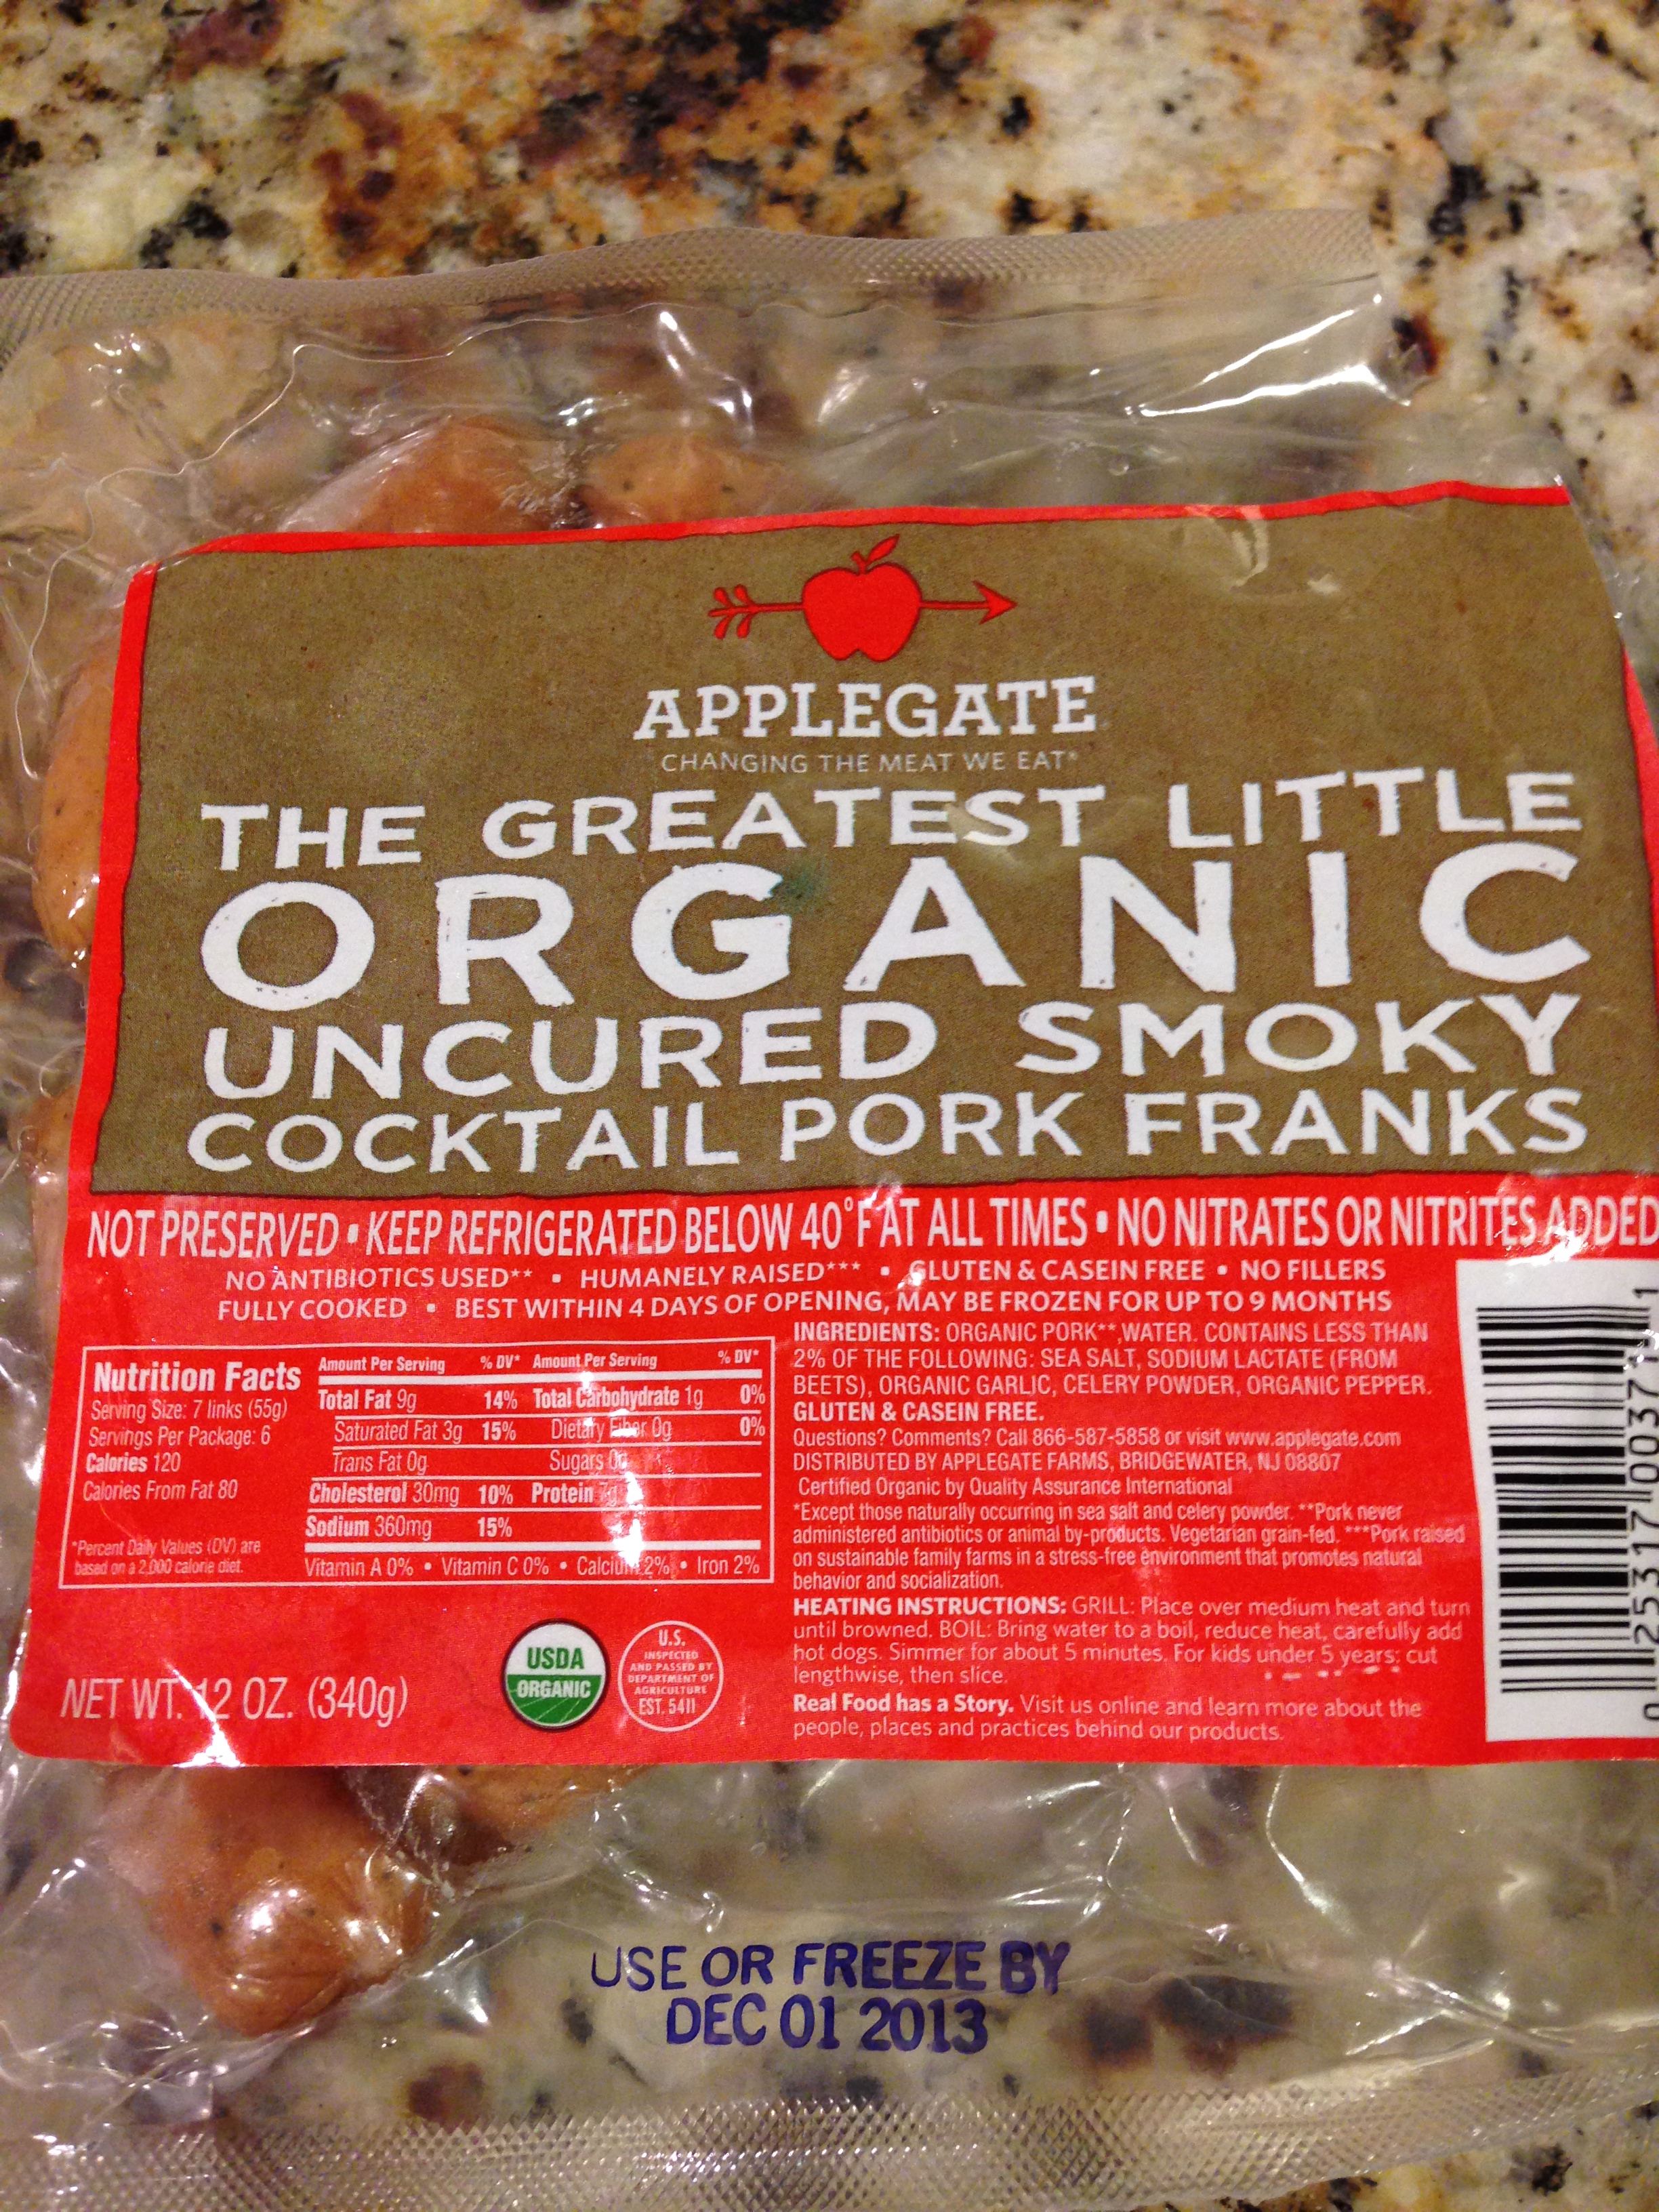
What kids (or adults for that matter) don’t love pigs in a blanket??  I know my family does, so when a friend tipped me off to these Applegate uncured cocktail franks, I knew what had to be done.  I found them at Whole Foods, and they were pretty pricey (about $7-8), but worth the splurge.  If you can’t find these in a store near you, you can always buy the Applegate hot dogs and cut them into many smaller pieces.

november 19 009

For the bread portion, I decided to modify a recipe from the amazing Against All Grain cookbook to see if it would work.  The original recipe is for Rosemary Breadsticks.

Paleo Pigs in a Blanket

1 1/4 cups almond flour

1 egg

1 TBSP olive oil

1/4 tsp sea salt

1/4 tsp baking soda

Applegate cocktail smokies

Combine all ingredients (except smokies) using a mixer.  Roll dough out between 2 sheets of parchment paper.  You will want them to be thicker than crackers, but not by too much.  Use a pizza cutter to cut the dough.  I cut the dough into triangles as you can see below.  I was trying to mimic how Pilsbury crescent rolls are when you take them out of the tube.

november 19 008

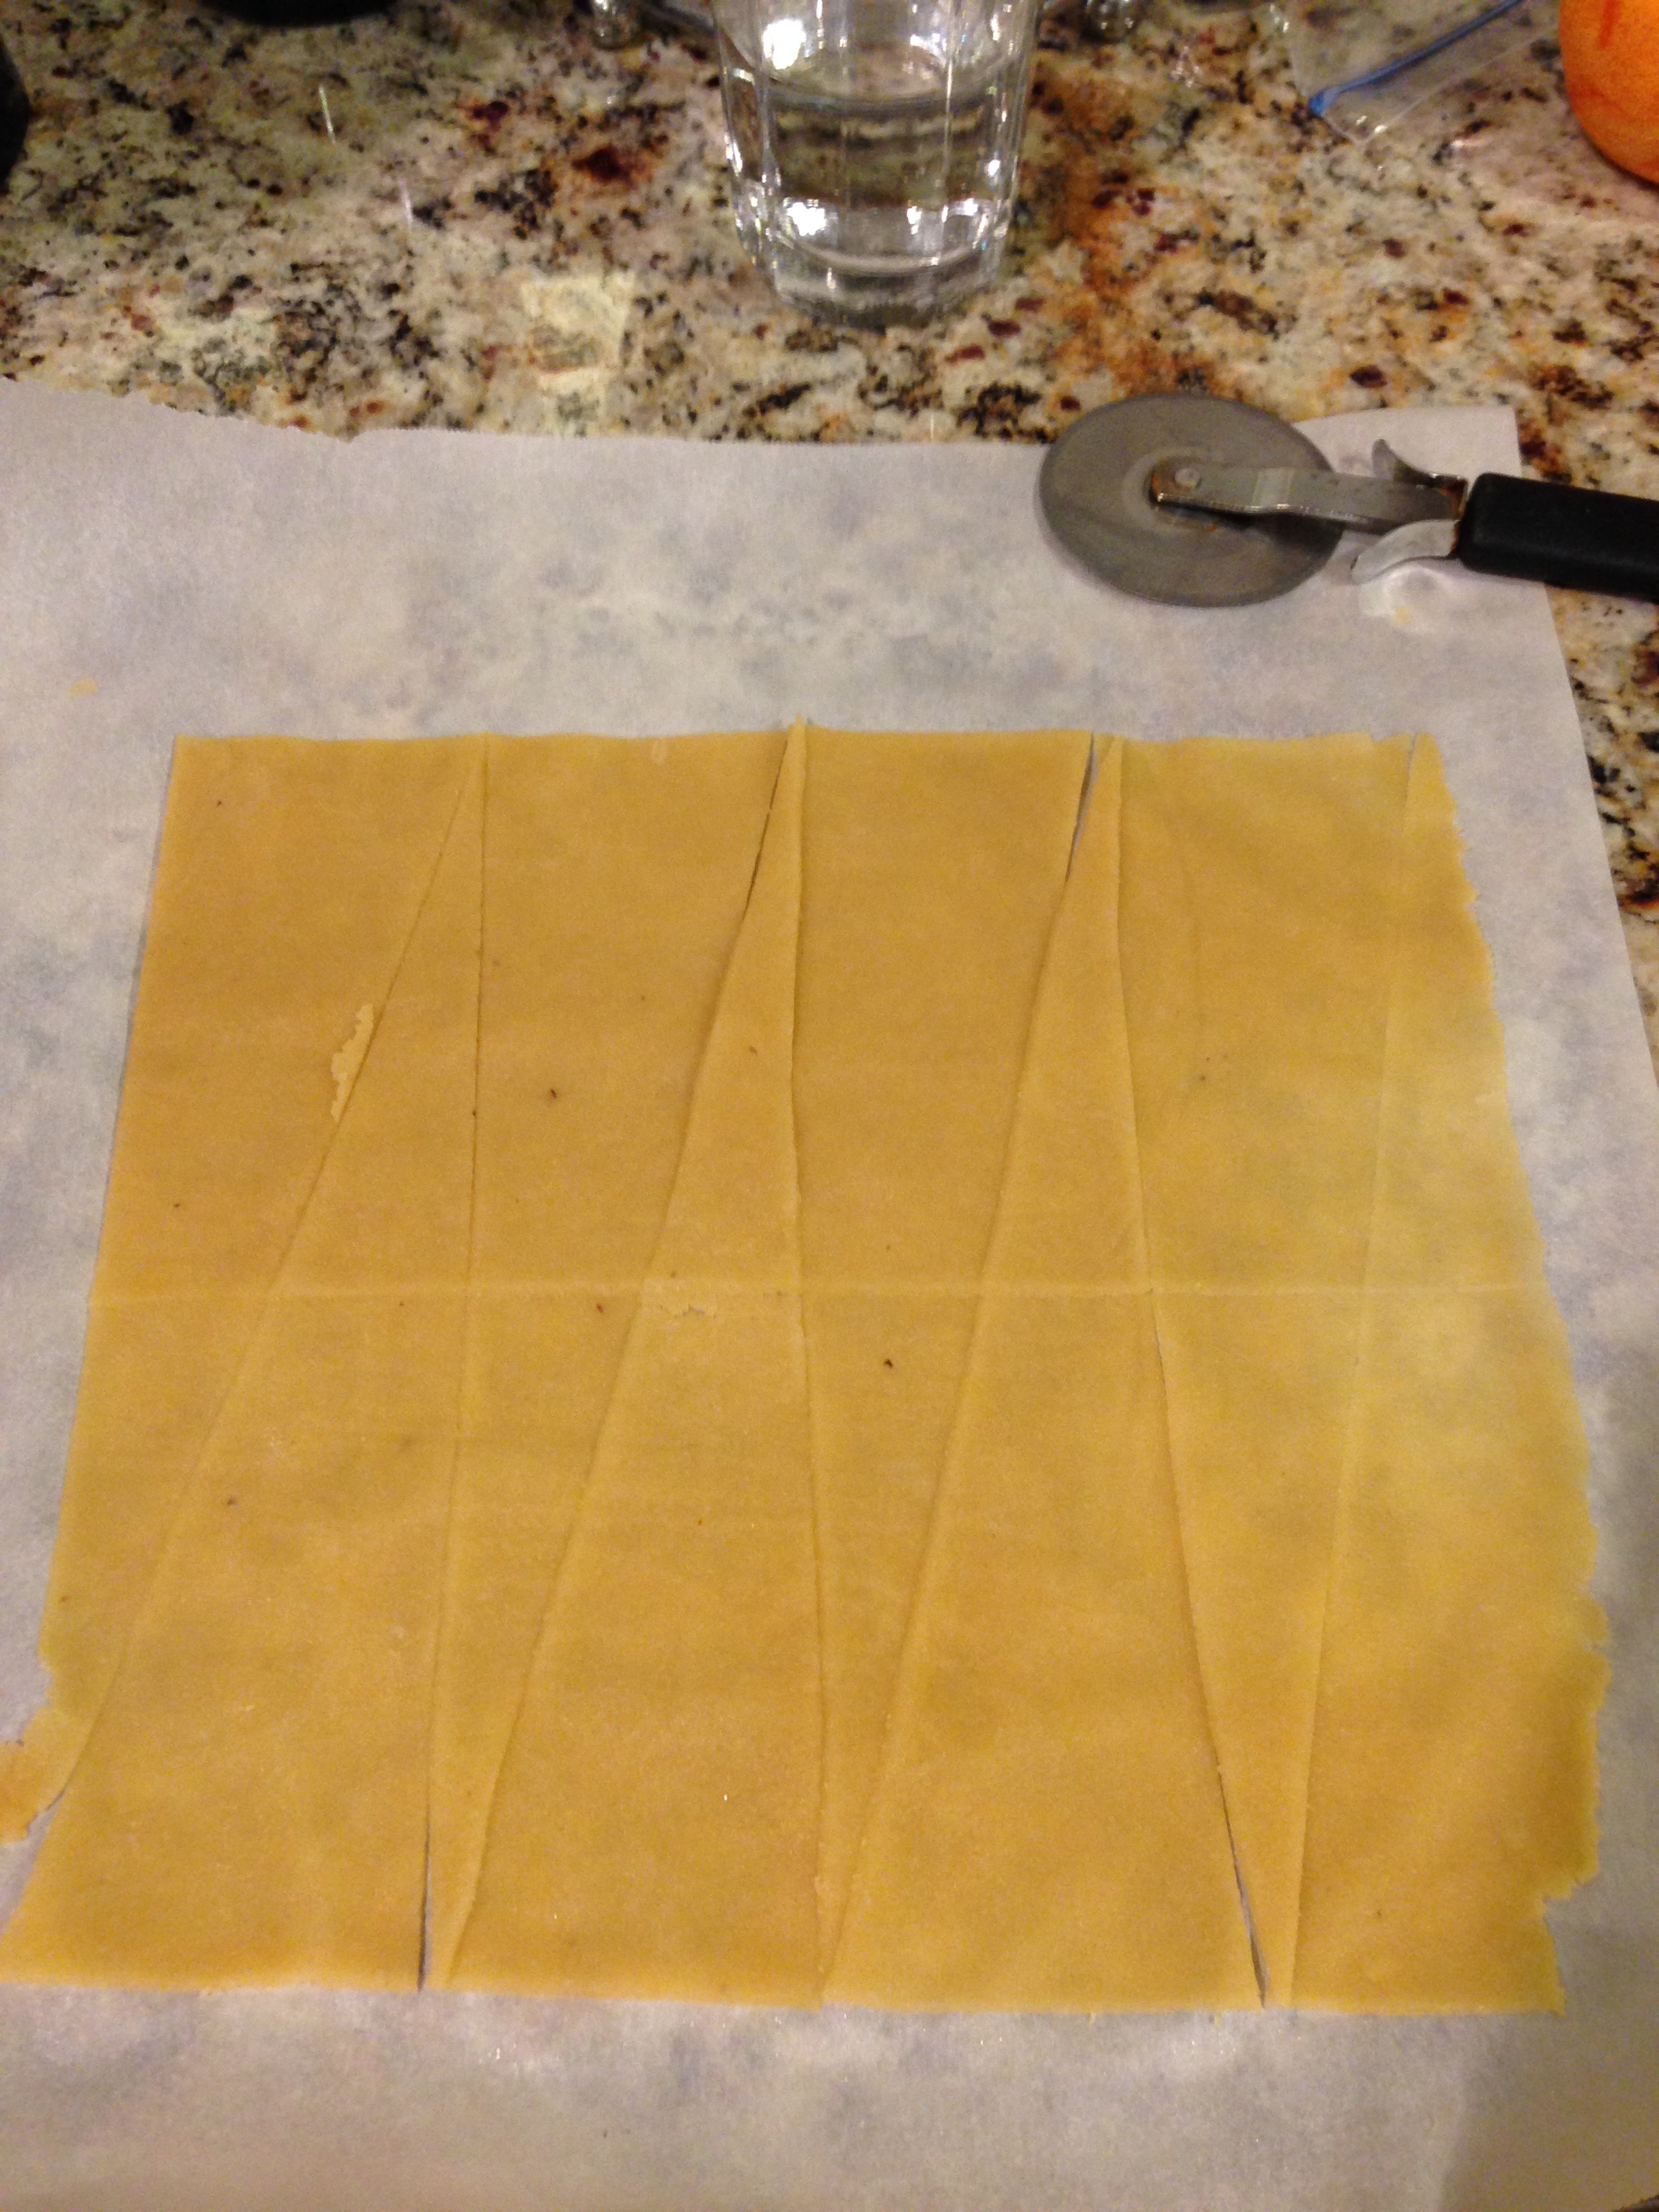
Then I cut the triangles in half.

Is any of this making sense?  Ok, good.

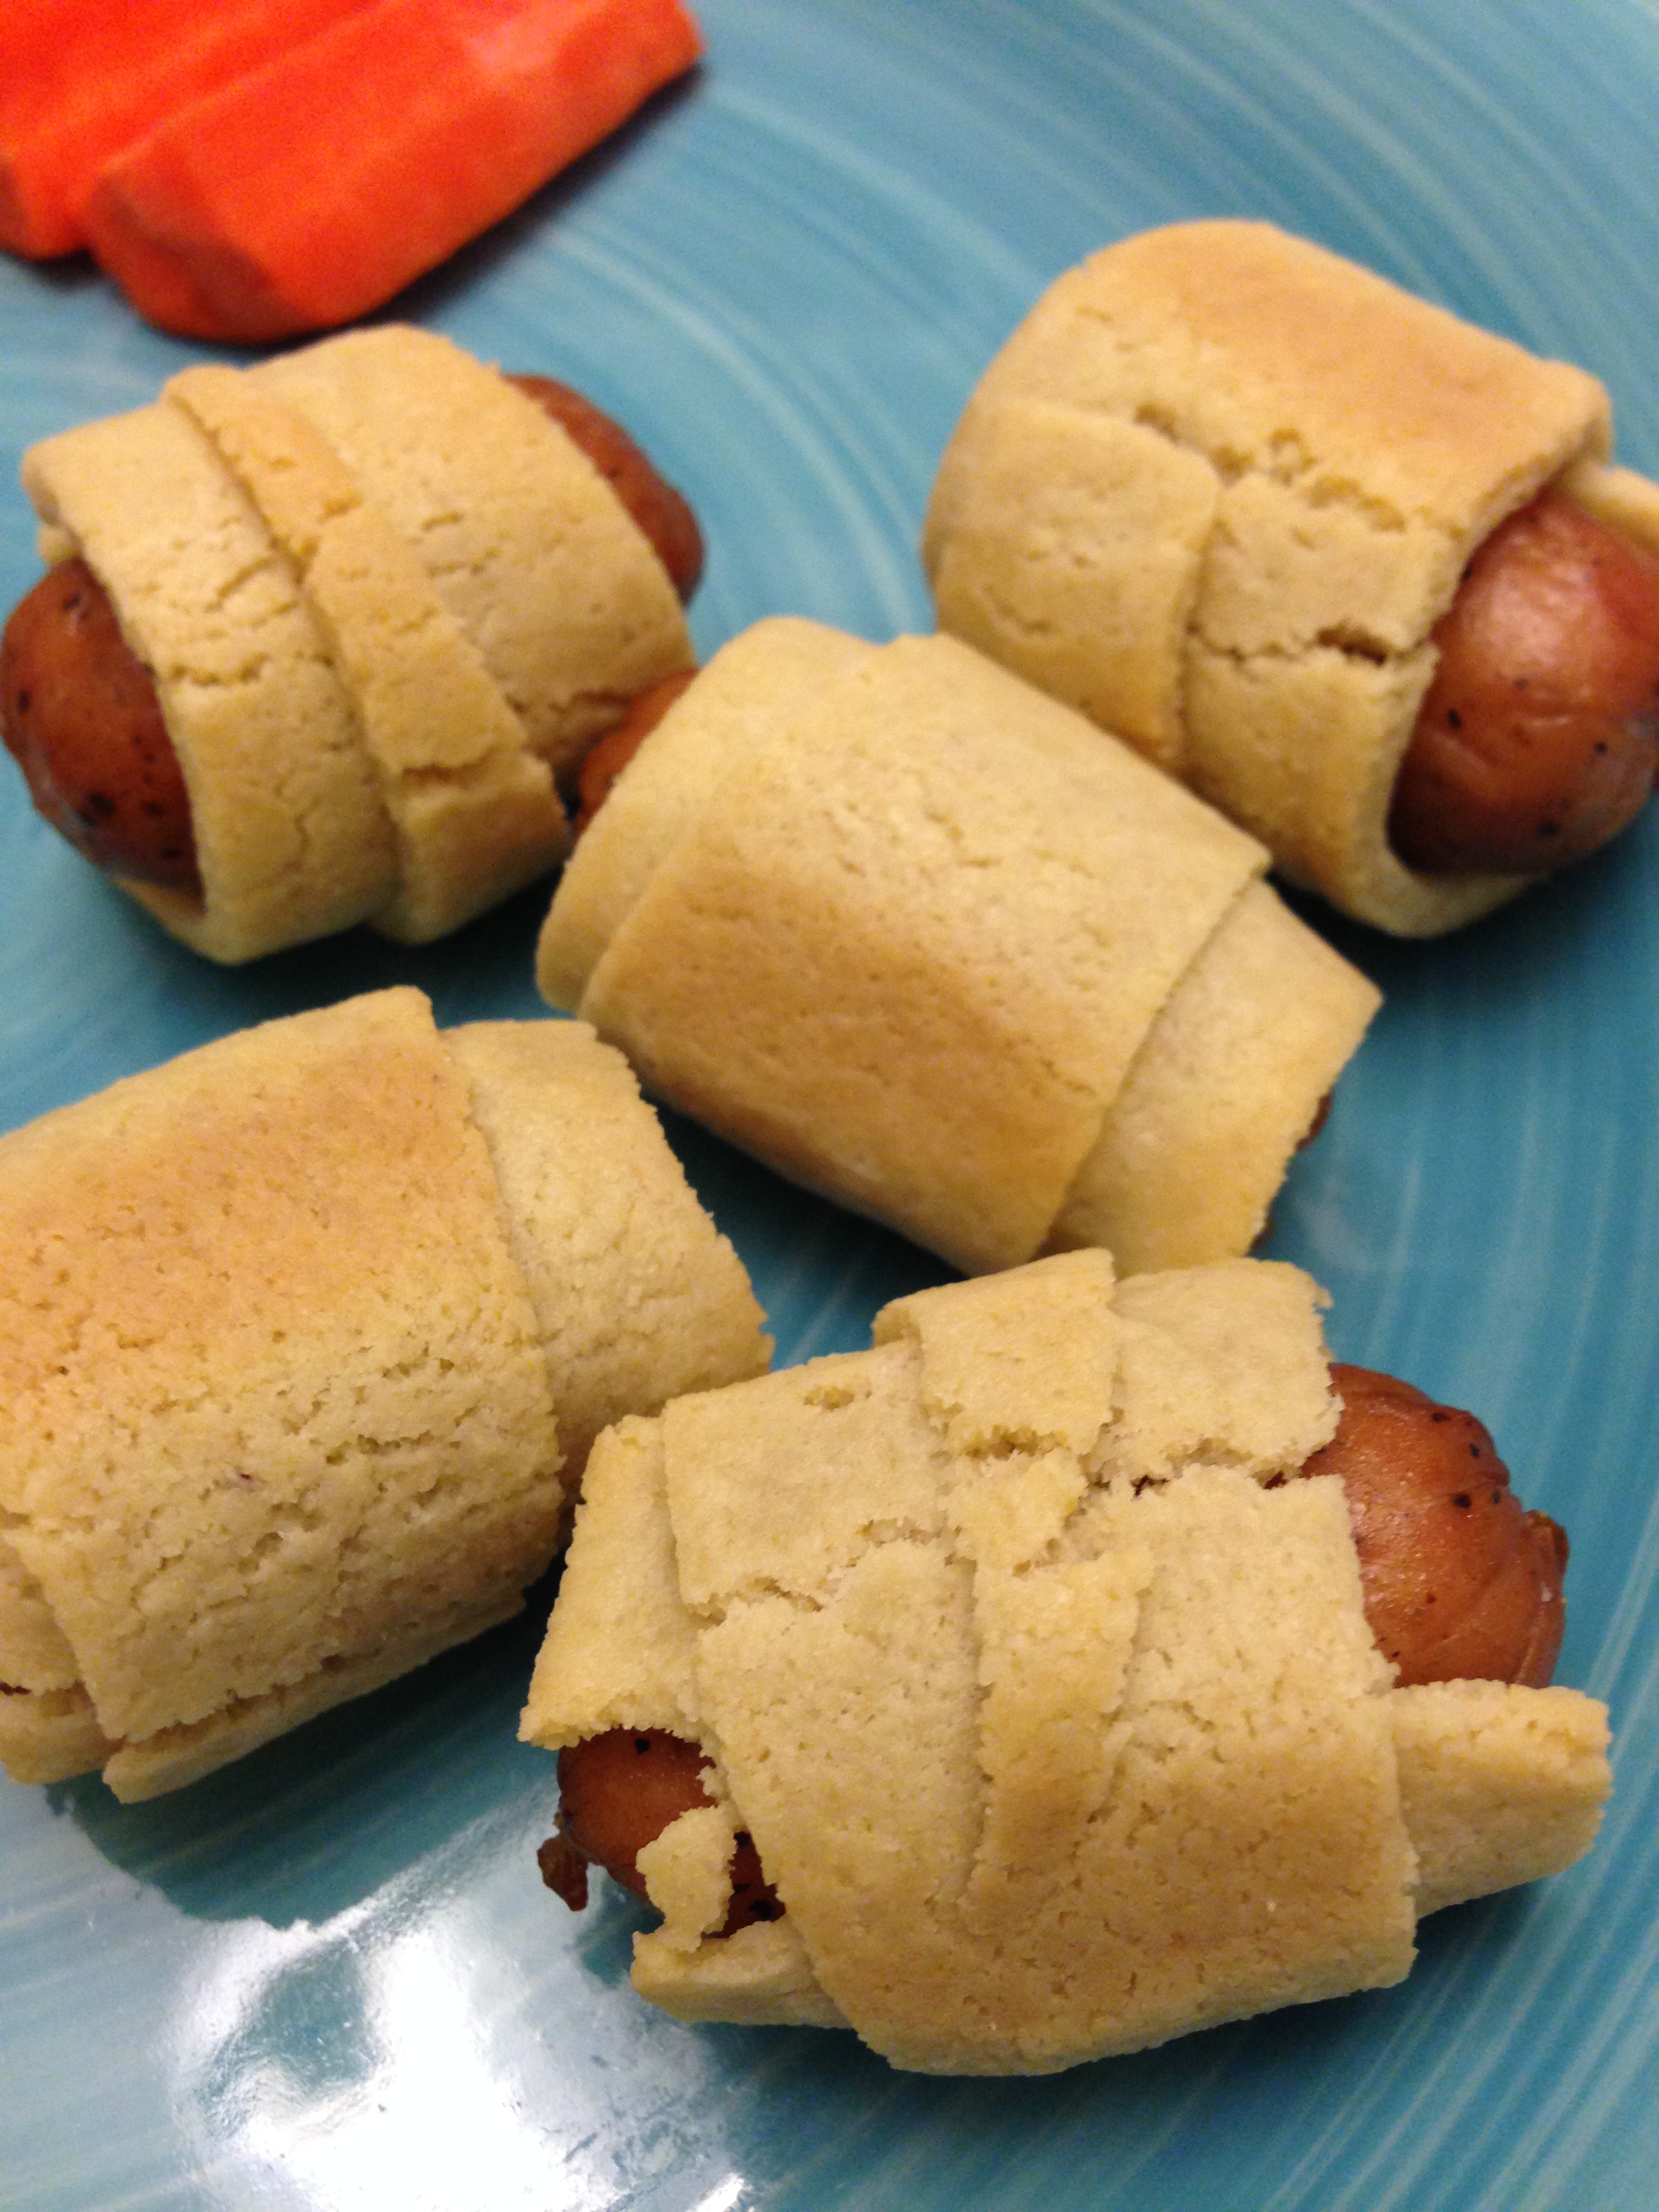
Then you roll the smokies up in the dough (start at the wide end and roll up towards the narrowest part of the dough).  Place finished product on a baking sheet.  I like to line mine with parchment paper.

november 19 010

Bake at 350 for approximately 15 minutes.

Enjoy your kids’ squeals when you tell them you are having pigs in a blanket for dinner!

november 19 012


Cookie Dough Balls (Raw, Paleo)

Recently we took Mario to a more homeopathic doctor to help us see if there was anything else we could do to help his remaining symptoms from leaky gut.  If you remember, before we started our dietary journey, Mario was dealing with eczema, hives, repetitive tics, and chronic diarrhea.  Much of that has cleared up, but there are still some nagging symptoms.  He has some very mild skin issues and chronic tummy pain.  We wanted to see if there were any foods that we needed to eliminate and also see how we were doing regarding healing his gut.

The results were kind of defeating.  His gut is still definitely leaky, as evidenced by this list of foods that is causing distress in his body:

september 24, 2013 055

Now this definitely doesn’t mean that he is allergic to all of these foods, although there are some, like casein (the protein found in milk) that his body just goes crazy with.  We are definitely eliminating that, although all he was eating at the time of this test was cheddar cheese.  Eggs and peanuts are also things that have consistently shown up as high problem areas on previous tests, so we are eliminating those as well.   As for the rest, our doctor’s advice was to rotate foods and do our best.

I am trying not to be discouraged.  We really have come a long way as he is completely tic-free and hasn’t had any hives in years.  But we still have a long way to go.

Necessity being the mother of invention…..I threw together this snack on the fly and it turned out great!

Raw Cookie Dough Balls

1 cup raw cashews

1/4 cup raw pumpkin seeds

2 TBSP raisins

1 TBSP honey

2 TBSP Enjoy Life mini chips

Start by turning your cashews into cashew butter using a food processor.  It takes awhile and mine turned into more of a ball of dough than an actual butter.  For this reason, I’m not sure if jarred cashew butter would work with this recipe.

Add the pumpkin seeds, raisins, and honey to the cashew butter/dough.  I pureed it all until it was nearly all smooth.  Take the “dough” out of the food processor and add in the mini chips.  Roll into balls and enjoy.  Keep refrigerated.

september 26, 2013 015

Everything Crackers (Paleo, SCD, Nut-free)

Every once in a while, my body needs a break from eating nuts.  Mostly because I tend to go overboard with them.  I can’t seem to eat just a handful of pistachios….I have to eat a cereal bowl full of pistachios.  You get the point.  And while nuts aren’t nearly as inflammatory as grains, when you go overboard with them, they can cause issues.  Lately I have had a lot of neck pain that is causing headaches.  So in addition to seeing my chiropractor, icing my neck every chance I get, and getting decadent scalp massages from my husband, I am taking a break from nuts for a few weeks.

Which naturally meant that I had to invent a new nut-free snack—STAT.

These crackers are inspired by Everything Bagels.  I used to love those, but even in my bread eating days, they were a little bread-y for me.  I mostly loved the savory-ness of them, and that is what I wanted to capture in this snack.  The base of the cracker is all seeds and I was impressed with how crunchy they got in the oven.  I put all of my crackers (except the Parmesan cheese crackers) in the dehydrator because it helps them stay crunchy for days and weeks, but I really feel like these crackers would work in the oven.  They might only keep for a few days, but let’s face it…..you’re probably going to eat them all in a few days anyway 🙂

Everything Crackers

1/2 cup + 2 TBSP raw pepitas (pumpkin seeds)

1/2 cup raw sunflower seeds

2 TBSP sesame seeds

2 TBSP flax seeds (if you don’t have these on hand and don’t want to buy them just sub in extra sunflower seeds here)

1 TBSP poppy seeds

1 TBSP dried minced garlic**

1 TBSP coconut aminos

1 egg

1 tsp. sea salt

1/4 tsp. pepper

1/4 tsp. onion powder

**If you also have dried minced onion on hand, try it with 1/2 TBSP minced onion, 1/2 TBSP minced garlic and omit the onion powder.  This was my intention but I didn’t have any dried minced onion.  Either way, they are delicious.  Just giving you options :)**

Preheat oven to 350.

In a food processor, pulse 1/2 cup sunflower seeds and 1/2 cup pumpkin seeds until they resemble a meal/flour.  Add all other ingredients (including the remaining 2 TBSP of pumpkin seeds) and pulse to combine.  You want there to be visible seeds in the crackers.

Spread your mixture onto a sheet of parchment paper.  Then cover with another sheet of parchment paper.  Use a rolling pin to roll the crackers out.  I talk more about rolling out crackers on my Parmesan cracker post if you are interested.

August 30, 2013 298

Use a pizza cutter to cut them into whatever size you prefer.  Sprinkle with a little more sea salt.

Transfer the crackers and parchment paper to a cookie sheet and bake for approximately 10-15 minutes.  The baking time will depend on the thickness of your crackers.  Just remember that crackers are very thin and can burn very, very quickly.  Watch them closely!

After my crackers began to brown around the edges, I transferred them to my dehydrator for 3-4 hours to achieve the perfect crunch.

If you don’t have a dehydrator, try baking them at 275-300 for a longer period of time.  I was pleasantly surprised to see the crunch that the oven produced on these crackers.  Please let me know if you make them and what your experience was!!

August 30, 2013 304

Paleo Mint Chocolate Chip Ice Cream

Recently my son was bemoaning the fact that he doesn’t eat candy anymore.  Granted, we do allow the boys to cheat every once in a while, but it is far from a free-for-all at our house.  I asked him his very favorite candy and his answer was:  mommy’s favorite Christmas candy.

Ahh, peppermint bark.  Yes, I have been known to eat a bar (or twelve!) of Ghiradelli peppermint bark during the holiday season.  Last year, I started giving the boys little nibbles of it, and they were hooked as well.

So when I announced that I bet I could make an ice cream that tasted like mommy’s favorite Christmas candy, Mario’s eyes nearly bugged out of his head!

I know that most store bought mint chocolate chip ice cream is green, some is even just plain white, but in the spirit of the candy cane, I used India Tree natural food coloring to make ours a pale pink.

Peppermint chocolate chip ice cream is a perfect flavor for a hot summer day…..or to eat while admiring your Christmas lights.  Meanwhile, Mario has declared it the best ice cream ever.  Maybe even the best thing he ever tasted.  I tend to agree…..

Paleo Mint Chocolate Chip Ice Cream

2 cans full fat coconut milk (preferably chilled)

1/2 cup honey

1 tsp. peppermint extract

2 tsp. vanilla extract

1/2 cup enjoy life chocolate chips or other soy/dairy free dark chocolate, coarsely chopped

India Tree red food coloring (optional)

Combine all ingredients and add them to your ice cream maker.  Prepare according to the ice cream maker instructions.  Enjoy!!

August 2013 012

Smoked Salmon, 2 Ways

Fall is coming soon, and these last few weeks of summer are a great time to start experimenting with healthy lunchbox options for the school year!  Today, at lunchtime, I looked in my fridge and saw some smoked salmon.  I knew it could be a quick and tasty lunch, but racked my brain to find a way to make it fun for the boys.  They were delighted with what I came up with and each of them agreed that they would like to take these in their lunchboxes this fall when school starts.

First I made some salmon and cucumber “sandwiches”.  I kept it simple for my oldest son, by just placing the smoked salmon between 2 slices of cucumber.  Paired it with some fruit and cheese cubes, and it was a super simple lunch!

August 3, 2013 007

For my younger son, who is a bit more adventurous, I mimicked a sushi roll (without the rice of course).

August 3, 2013 008

Started with small sheets of seaweed, and added smoked salmon and cucumbers.  Cream cheese and/or avocado would also be delicious additions here.  Maybe some grated carrots if you don’t have cucumber.  That would add a nice crunch and some color!  For my husband and I, I added some goat cheese.  I have to say, these were a bit messier than making a PB&J, but when it comes to lunch packing, they are so much healthier and didn’t take any time at all!  If you are good at rolling them up, and have a better presentation than me, you might even be able to serve them as little appetizers at a get-together!

August 3, 2013 009

So tell me…..would your kids eat this?

Chipotle Lime Chicken Jerky (Paleo, SCD)

I would love to say that I came up with this one all on my own, but I have to give credit where credit is due.  I was searching online for paleo beef jerky marinades and I came across a message board here.  All the way at the bottom, someone named Joshua gave this recipe.  I made a few very small tweaks and it is GENIUS!!!  Even better, it tastes AMAZING on chicken, which is great because clean, organic chicken is much more affordable than grassfed beef.  I love it because it is a change from that soy sauce/brown sugar typical-tasting jerky.  It has a kick but both of my 6-year old boys can tolerate it.

Not only is this a guilt-free snack (rarely do you hear someone complaining that they have GOT to stop eating organic chicken!), but it is great for snacks on the go, road trips….and even lunchboxes.  Oh yes, lunchbox time is coming soon.

So without further ado…..

Chipotle Lime Chicken Jerky

3 lbs of boneless, skinless organic chicken thighs

2 TBSP smoked paprika

1 TBSP fresh cilantro

1/2 TBSP black pepper

1 TBSP sea salt

1 clove minced garlic

juice of 1 lime

1/4 cup coconut aminos

1 TBSP honey

1 tsp cumin

1 tsp oregano

Slice your chicken thinly (sometimes it helps for the chicken to be firmer, so if you need to put it in the freezer for about an hour beforehand, that will help.)  1/4 inch slices are probably ideal, but if it’s a little thicker it’s not going to be the end of the world.  Remove any larger pieces of fat (there is no harm in leaving it there, but they will be more likely to spoil).  Combine all of the other ingredients for the marinade.  Place chicken and marinade in a large container and refrigerate.  Marinate for 8-12 hours.  Remove chicken from marinade and place chicken in a single layer on your food dehydrator trays.  Dehydrate at 155 degrees for approximately 6-8 hours.  The time will vary based on how thick your slices are.  You may want to flip the jerky at the 3 hour mark.  Just keep an eye on it, and remove it when it resembles jerky!

If you do not have a food dehydrator, I know this can be done in your oven as well.  I did some googling, and this website gives some instructions on how to make jerky in your oven.

Enjoy!

August 3, 2013 012

Cheeseburger Pie (Primal, SCD)

Back in the day, I bought Bisquick.

True story.

When my husband and I got married 10 years ago, I had no idea how to cook.  My repertoire was meatloaf and spaghetti and meat sauce.  That was about it.  So when I discovered that the Bisquick box, had recipes….it was ON.  There was a recipe on the box called Impossible Cheeseburger Pie.  Now that I think about it, I think it’s kinda funny that they called it “impossible”.  Especially since tonight I recreated it (grain-free) without a second thought.  But back then, I thought it was magical.  I’ve come a long way, baby.

So tonight when I was wondering what I would do with my thawed out pound of grassfed beef, I remembered that cheeseburger pie, and realized….it wasn’t so impossible after all.

Here’s the secret, y’all:  it’s basically a fritatta.  Of course, this info would not have helped me 10 years ago, as I had no idea what a fritatta was.

I didn’t really take any measurements for this recipe, but trust me, you’ll do just fine.

Cheeseburger Pie

1 pound ground beef

1/2 onion, diced

any veggies that you have on hand

5 eggs

cheddar cheese (optional)

salt, pepper, garlic powder

Preheat your oven to 350.  Brown your ground beef and onions in a skillet.  I also added mushrooms to mine.

  July 17, 201 210

Drain the grease.  Season with salt, pepper, and garlic powder (or any other seasonings that sound good to you!)

Grease a glass 8×8 pyrex dish (I used coconut oil) and add your meat to the dish.

If you are using cheese you can sprinkle it on top of the meat.  I used between 1/4-1/3 cup of shredded cheddar cheese.

Then because I had spinach on hand and I wanted to make it colorful, I sprinkled spinach on top.

July 17, 201 211

Next just beat 5 eggs and pour on top.  (You can certainly use more, I just didn’t want it to be overly eggy!)

July 17, 201 212

Now bake for about 20 minutes or until the egg is firm.

July 17, 201 213

Serve with whatever sounds good!  We had roasted carrots, seasoned with cinnamon and nutmeg, and raw veggies.

July 17, 201 214

July 17, 201 215

And there you have it.  Cheeseburger pie–no bisquick required.


Paleo Salmon Cakes and Sweet Potato Chips

I made a simple summer supper last night.  It was delicious, healthy, and didn’t require me to thaw anything out or turn on the oven.  If you are like me, you need to have a few easy go-to meals for those nights when you wait to late to thaw anything out or if your brain is just too fried to think straight.  Hopefully your days of ordering a pizza are over.  Our go-to meals on days like this are Applegate Farms all-beef hot dogs and omelets.  But these salmon cakes are just as easy and much more delicious.  I buy canned wild salmon at Costco, which makes it easy for me to grab a couple of cans out of the pantry when I can’t decide what to make for dinner.

July 1, 2013 031

The recipe for salmon cakes is ridiculously simple and basic, which is the point.  Feel free to add any of your favorite flavors or spices to personalize it!

Salmon Cakes (makes 8 small/medium cakes)

2 (6 ounce) cans of wild salmon, drained

1/4 cup almond flour/meal

1 egg

1/3 cup onion (I prefer white onion, but last night I used green onions, because that is what I had)

1/2 tsp salt

1/2 tsp smoked paprika

Put all ingredients in a bowl and mix by hand.

July 1, 2013 012

Heat up some olive oil in a skillet (I use medium/medium high heat) and place the formed patties into the olive oil to cook.

July 1, 2013 014

Brown both sides.  Depending on how warm your pan is, the total amount of cooking time will probably be about 8-10 minutes.  Serve warm.

Much to the delight of my family, I also made sweet potato chips–a simple and delicious treat.  I slice my sweet potatoes using my food processor.

July 1, 2013 013

Then I add them into a cast iron skillet that has about 1/2 of heated coconut oil in it (I keep the temperature very close to medium–4–while frying these).  Turn as needed and fry until the chips begin to darken.

July 1, 2013 015

I place them on a paper towel on a plate and add salt.

We had some leftover slaw on hand and I added some raw veggies and we ended up with a very easy and delicious summer meal!

July 1, 2013 017

Paleo Pad Thai Sauce (tastes great on Kale!!)

You know one thing I miss from our days of eating processed foods?

Condiments!  I love sauces and dips and dressings and there are literally almost no “clean” condiment options out there.  I have found a few gems, but for the most part have just done without.

But this week, I was making some coconut chicken tenders (a favorite around here!  Just follow my recipe for coconut shrimp but use sliced chicken breast instead of shrimp!!), and was feeling a Thai vibe.  I also had some kale that I really needed to prepare while it was fresh–as my mom would say, the kale “needed to be eaten”.  I, myself, wasn’t feeling overly enthusiastic about the kale, so I thought I would try to liven it up with some dressing.  In keeping with a Thai theme, I tried my hand at making a Pad Thai-type of sauce, and to my delight, my family gobbled up every last bit of the kale!!

First I tore the kale into pieces, discarding the stems.  I heated up coconut oil in a skillet and then sauteed the kale in the oil, just until it started to soften up.  I removed it from the heat and stirred in about half of the sauce–just enough to coat the kale.  It was delicious!

June 14, 2013 079

Paleo Pad Thai Sauce

1/4 cup almond butter

1 TBSP rice vinegar

1 TBSP coconut aminos

2 tsp honey

1/2 tsp minced ginger

1/2 tsp minced garlic

zest of 1 lime

a few dashes of salt

Mix all ingredients in a bowl and let sit for a few minutes for the flavors to meld.  Store unused portion in the refrigerator.  Use within a week.

This sauce is really awesome–you could use it to make Pad Thai with spaghetti squash or zucchini noodles.  I may even try to make Pad Thai with the cauli-rice!  You could thin it out a bit with a few teaspoons of water and use it as a salad dressing.  It makes a great dip for the aforementioned coconut chicken tenders.  And I just drizzled it over an avocado and sprinkled with sesame seeds for a delicious afternoon snack!

June 14, 2013 159

The only question is–what will you do with it?


Breakfast Pizzas (Paleo, Primal, SCD)

When making a dietary shift that involves ditching gluten or grains, breakfast can sometimes be the biggest obstacle.  Especially if you have kids!  The most common items that kids eat for breakfast are typically carb-heavy things like waffles, pancakes, cereal, granola, muffins, or bagels.  Sometimes omelets seems like “adult” fare.  I know that I never had an omelet growing up!

Recently, I was making myself an omelet and I got the idea for this breakfast.  To me, it’s prettier than an omelet, and more kid-friendly.  It’s certainly nothing ground-breaking, but it might be a way to get a paleo/primal foot in the door at breakfast with your kid.

For the boys, I kept it simple with ingredients that I knew they liked.  Eggs, Canadian bacon, and cheddar cheese.  Next time I will probably try adding veggies to theirs.

Get your pan warmed up and use ghee, butter, or coconut oil to grease the pan.  I keep the pan on a low-medium setting the entire time so that the eggs will cook through without burning on the bottom.

Scramble 2 eggs and pour them into the pan.

june 3, 2013 150

Once the eggs begin to firm up around the edges, you can start putting toppings on your “pizza”.  Like I said, for the boys I went simple with Canadian bacon and cheddar.  I let it cook until the eggs were cooked through and the toppings were melted nicely.

june 3, 2013 151

The pizza transferred easily to a plate, and the boys got a kick out of having “pizza” for breakfast.

june 3, 2013 152

For mine, I just scavenged through the veggies in our fridge.  I went with mushrooms (which I sauteed before adding on top of the eggs) and spinach.  I only used 1 egg for mine, and it still worked out very well!  I also added cheddar cheese to mine, and topped it with salsa and homemade yogurt.

june 3, 2013 157

The topping possibilities are endless and can be very specific for your child.  You could also use the toppings to make a design or a happy face in the pizza.  Or if your kids or old enough, let them “decorate” their own pizza!

  Some topping ideas are:  onions, spinach, kale, bell peppers, olives, tomatoes, sausage, bacon, ham, prosciutto, cheese, broccoli, zucchini, mushrooms, scallions, salsa, or fresh herbs.

Of course, I may be biased, but I think my pizza was the most delicious…..

june 3, 2013 158