Savory Waffles (Paleo, SCD, Grain-free)

My kids are waffle fanatics.  Frozen waffles were always our go-to breakfast before going grain-free.  So one of my first orders of business when we made our dietary change was to buy a waffle iron and find a great grain-free waffle recipe.  This is the first recipe we ever tried, and the waffles are so amazing, we’ve stuck with them ever since.  I make large batches of these waffles and freeze them for easy breakfast or lunch options.

While my kids love the traditional, slightly sweet waffles, I’ve been craving a more savory option.  I’ve tried another paleo savory waffle using a recipe I found online, and while the flavor was great, the waffle itself was very dense and heavy.  I was hoping this recipe would result in a more fluffy waffle and it did!!!

When I told my kids that I was going to make waffles with bacon and onions inside, they were supportive.  Until I told them that it would take me about 20 minutes to get them ready (they are used to me popping waffles in the toaster, so this was quite disappointing).  My oldest son asked:  Mom, why do you have to do everything the hard way?  Just get one of the regular waffles, put some bacon and onion on top, and put another waffle on top of that.  That’s what I would do.

So sure, you could do it that way.  But the hard way is much tastier 🙂

The yield of this recipe will depend on your waffle iron.  Our waffle iron makes 4 Belgian waffles at a time, and using this recipe, we had 6 waffles.

Savory Waffles (makes about 6)

1 cup blanched almond flour

2 Tbsp. coconut flour

3 eggs

1 cup of unsweetened coconut or almond milk (I used full fat canned coconut milk).  You could even use SCD legal yogurt.

4 pieces of bacon, cooked until crisp, crumbled (reserve the fat from the bacon)

1/4 cup chopped green onions or chives

1/2 tsp baking soda

1/2 tsp sea salt

1/2 tsp garlic powder

Prepare your bacon, cooking until crisp.  Set aside and reserve your bacon fat.  I keep a special can in my fridge just for bacon fat.  True story…..

march 21, 2013 113

It comes in handy!  Sometimes if I’m going to make a roast in the crock pot, I will sear it in bacon grease before I put it in the crock pot.  Or like tonight at dinner, I heated up some bacon grease and cooked some sliced shallots in it and then added baby spinach until wilted.  Talk about a yummy side dish!!  Anyway, bacon grease.  It comes in handy and adds great flavor!

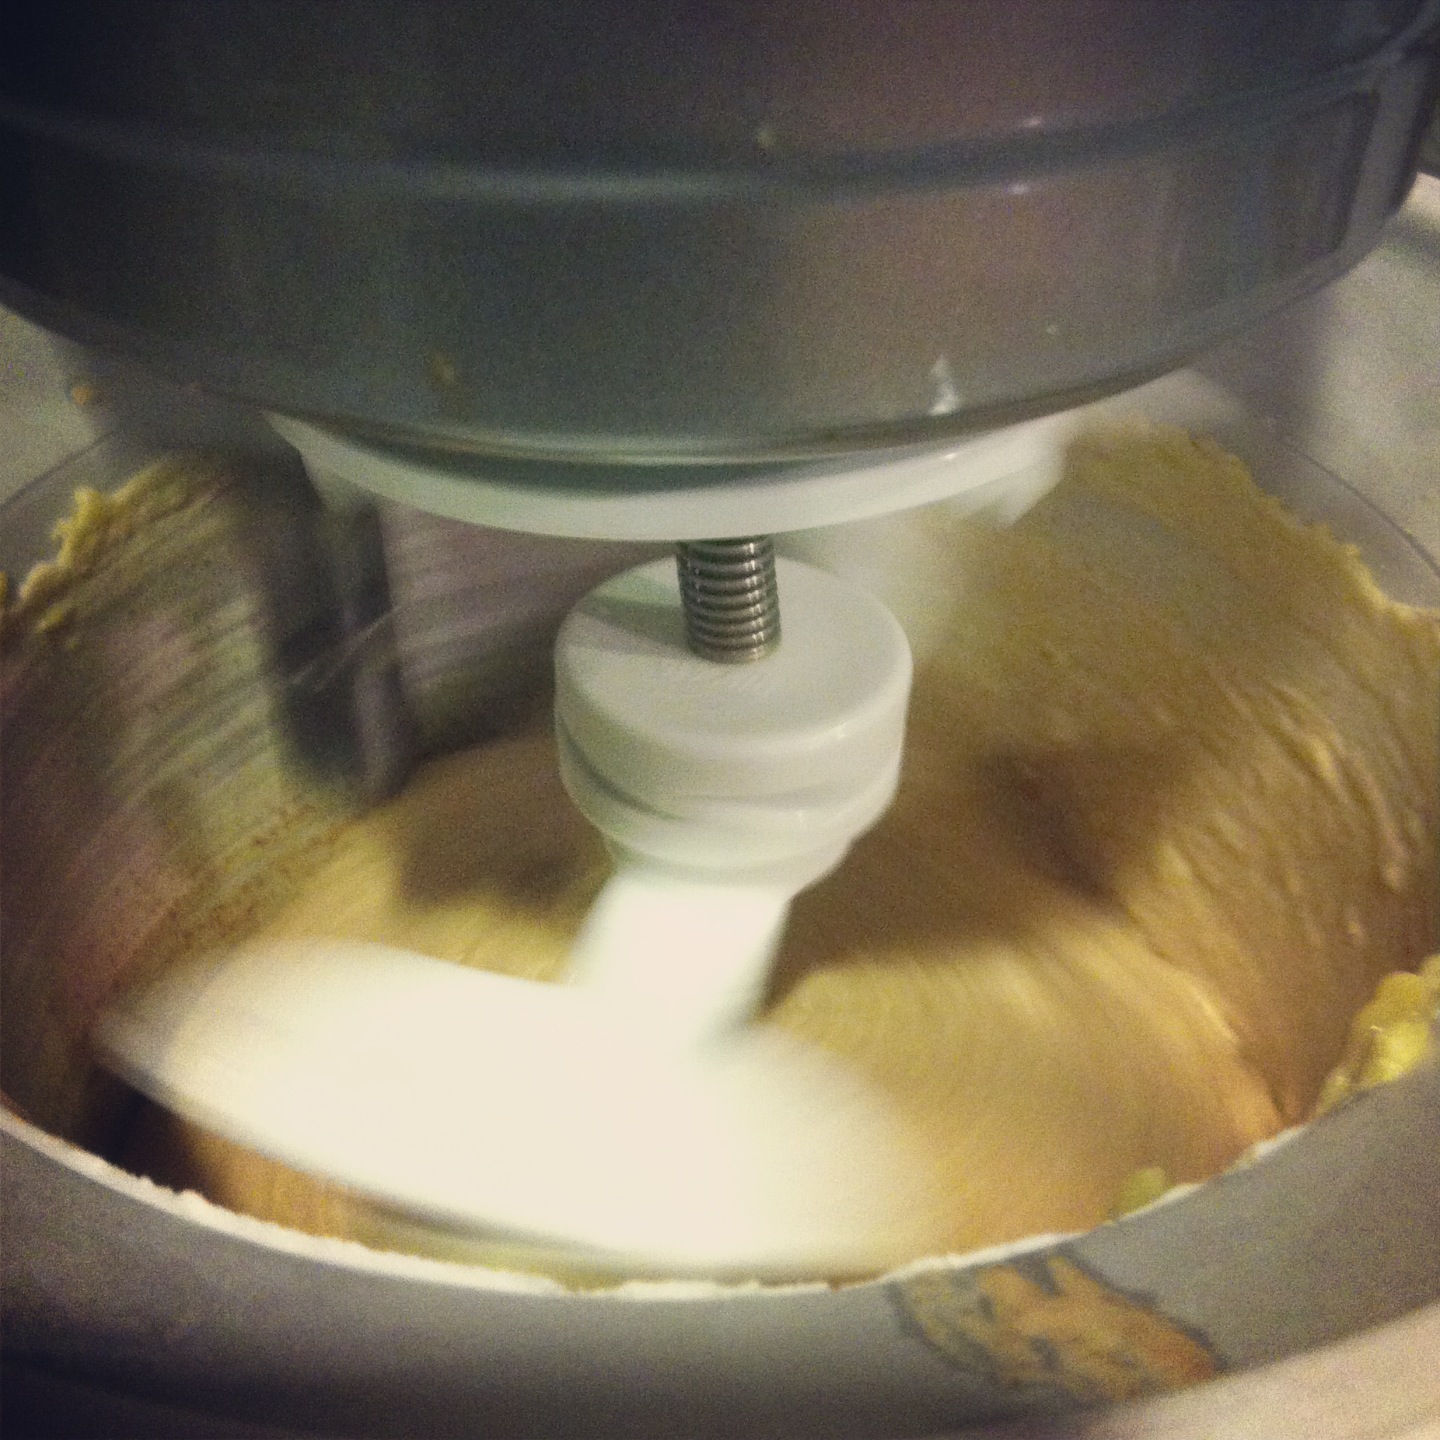
Start by blending your eggs and milk of choice.  Then add in all the rest of the ingredients (except bacon and green onions) and blend.  Once everything is blended, fold in the crumbled bacon and green onions.

march 21, 2013 112

After you stir that batter up all nice and good, get your waffle iron heating up.  Once your waffle iron has heated, get a pastry brush and dip it in the bacon grease.  Use this to grease the waffle iron.  Oh yeah, it’s good.

The batter is pretty thick, but don’t worry.  It will look like this when you add it to the waffle iron:

march 21, 2013 114

Just use a little rubber spatula to spread it out like this:

march 21, 2013 115

There ya go.  From then on, follow the directions on your waffle iron as far as cooking it goes.  I served mine with a runny egg on top.  I think these waffles would be pretty yummy with pure maple syrup if your diet allows and if you like sweet and savory dishes.  Also these waffles could be great for savory sandwiches.

march 21, 2013 116

march 21, 2013 120

march 21, 2013 121

Enjoy!


Asian Lettuce Wraps (Paleo, SCD)

We rarely go out to eat.  Like almost never.  Our dietary issues are too great–it’s almost embarrassing.  I do not enjoy being a high maintenance customer–I prefer to do high maintenance in the privacy of my own home, thankyouverymuch.  But last weekend, my husband suggested we have lunch at PF Changs.  We have always had a great experience there–they are very diligent about dietary needs, and we love the food.

So I thought this was going to be a huge treat.  I expected lots of screaming and jumping up and down from the kids.  So I made the big announcement–“today, for lunch, we are going to go to a RESTAURANT”.

And I got crickets.

Mario responded, okay great, but pack me a lunch to take.  When I refused, this evolved into tears and him sobbing that my food was better than a restaurant.  I mean I was flattered, but if we’re gonna go drop $40-50 at a restaurant, I’m going to enjoy it and not pack a lunch to go there.  Especially if there is suitable food (diet-wise) to be eaten.  We assured the boys that they loved the food there and that they had the lettuce wraps before and they loved them.

The story has a happy ending–we went to PF Changs, the boys ate the gluten-free lettuce wraps, and they did love them.  And I got a one-meal vacation from cooking.  All was well.

But I’d like to give them that kind of enjoyment a little more often, preferably without dropping $40 on a lunch.  So last night, I tried my hand at it.  It was really good and we will definitely make it again, although I may make a few tweaks here and there.  So I’ll tell you exactly how I made it and I will also tell you what I may do differently later on.  A quick google search led me to this recipe, which I used as my starting point.

Asian Lettuce Wraps

1 lb ground chicken

1 onion

1 bunch green onions

1 small package of mushrooms

3 carrots

8 oz. can of diced water chestnuts, drained

1/4 cup coconut aminos*

1 TBSP fish sauce

1 egg

1 TBSP honey

1/4 tsp. Chinese Five Spice powder

2 TBSP coconut oil

Bibb lettuce leaves for wrapping

*coconut aminos are the paleo substitute for soy sauce.  They are very tasty, but more bland than your typical soy sauce.  The cost is around $7 for a small bottle. 

The first thing you want to do is prep all of your veggies.

March 21, 2013 052

My kids do not like mushrooms.  I put them in the food processor until they looked similar to the ground chicken.  Once they cooked with everything and soaked up the sauce, you couldn’t even tell they were in there.  I peeled and grated the carrots and diced the onion and green onions.

Next step is to begin sauteing the white onion in the coconut oil.  Use a large pan or wok.  Once the onions are soft, add in the ground chicken, water chestnuts, and all the rest of the veggies (except the green onions).  While all of this is cooking, make your sauce in a separate bowl.

Add the coconut aminos, fish sauce, egg, honey, and Chinese 5 spice in a bowl and mix well.

March 21, 2013 053

Once the chicken and veggies are cooked through, pour the sauce over everything and add in the green onions.  Continue cooking until everything is heated through and then you are ready to eat.  Other than the veggie prep, this is a very easy recipe.

We served ours with romaine hearts because the Bibb lettuce at my store didn’t look awesome, but the Romaine was a FAIL.  I thought it would make cute little lettuce boats, but it didn’t work out so well.  But they tasted so good, no one seemed to mind.

March 21, 2013 059

The few changes I may make the next time I make this would be to add fresh garlic and ginger (both of which I had on hand but forgot about), and I would possibly up the Chinese five spice powder.  I might add about another 1/8 of a tsp.  A little of this spice goes a long way, in my opinion, but it gives the dish a special something.  Also to let you know how much this made–I will say A LOT!!  All the veggies I added bulked it up considerably.  Enough so that we all ate a lot and there was enough left for us to eat another meal–I froze the rest for an easy weekday dinner in the future.

March 21, 2013 061

Deep Dish Portobello Pizzas (Paleo, SCD)

Sometimes you just want a big ol’ pizza.  But if you’re looking to avoid the gluten gut-bomb that goes along with a typical pizza, why not try something new?

I’ve made deep dish portobellos twice recently–I did it a little differently each time, but the results were the same:  deliciousness.

The first thing you’re going to want to do is to hollow out your portobello mushrooms, by scraping out the gills.  You can use a spoon to do this.  The gills are edible, but you are doing this to make room for the pizza!

BEFORE

BEFORE

AFTER

AFTER

You should also pop out the stem.  Save it if you want (it is also edible) and chop it up and add it to your pizza with the veggies, if you feel so inclined.

Here’s how I did my first deep dish portobello:  I browned grassfed ground beef (sausage would be good as well) and onions.  Drained the fat and added the beef and onions to some homemade pizza sauce.  Filled the mushroom up with this mixture.  Then I sprinkled veggies on top (peppers, olives, whatever sounds good).  Then I sprinkled parmesan cheese on top.  And lastly, I topped it with Applegate Farms pepperoni.  I rubbed the outside of the mushroom with olive oil and baked the whole thing on 400 for about 15-20 minutes.  Delish.

march 4, 2012 025

Tonight, I got the hankering for pizza again, but didn’t have any meat thawed.  So I chopped up some veggies (bell pepper and onion) and chopped up Canadian bacon and pepperoni.

march 15, 2013 069

Then I stirred in my homemade pizza sauce, and used this mixture to fill up the mushroom.

march 15, 2013 074

Then I sprinkled with Parmesan cheese and baked at 400 for 15-20 minutes.  Again, it was really great (even though it just looks like a giant blob in the photo).

march 15, 2013 073

And no, I didn’t even serve veggies on the side.  In case you missed the memo, this is served in a GINORMOUS MUSHROOM.

I think it would also be good with shredded chicken and pesto topped with provolone cheese.  Oh my.

So what are you going to fill your mushroom with?

On Embracing It

Last night after I put the boys to bed, I was tired.  My husband was working late, so I had done the afternoon/evening routine alone–including an impromptu Costco trip.  I came downstairs and bypassed the couch, heading instead into the kitchen, where I started started soaking 12 cups of nuts for granola.  Then I rolled out and baked 2 batches of graham crackers and put them in the dehydrator.  And I pureed some cashews to ferment in the dehydrator overnight to turn into sourdough bread today.

I was tired.  And I was kind of headache-y.  I’m not telling you this because I’m trying to be a martyr–I’m not.  I’m telling you this because I surprised myself.  Because within minutes of trudging into the kitchen, I was re-energized.  I was singing along with Mumford and Sons on my ipod, and even dancing a little.  Sure, it could have been the new blonde roast Starbucks that I snagged myself on the way to Costco, but I think it was something else.

I enjoy this.  I love this.  I love my life.  And had you told me a year ago that this is my life, I would have been horrified.  Horrified, I tell you!!

But I love it.  And I feel more fulfilled than I’ve ever felt.

And I feel like I need to tell you that.  I’m not someone who came from a long line of food lovers and always dreamed up recipes in my spare time.  I fell into this quite randomly….through very troubling circumstances.  And I landed exactly where I was supposed to be all along.

I know a lot of people like my recipes and the Paleo lifestyle because they are into Crossfit and ripped bodies and super-health, and I love that!  It is awesome.  But there are others of you who are here as a last resort.  For your health or your child’s health, and I know it’s scary and it sucks at first.  But give it a chance.

It’s true–you may never like baking or spending time in the kitchen.

Or maybe you’ll find out that you love it.

Maybe you are going to meet your new best friend when you find out your kids both have similar food issues.  Maybe you are going to become an advocate for autism or Crohn’s or leaky gut and help others learn that diet can help in some instances.  Maybe you will simply and quietly remove all foods with artificial colors from your home, and that’s all you will do.

But isn’t that something?

Just embrace it.

“I will learn to love the skies I’m under.”–Mumford and Sons


Banana Almond Butter Ice Cream (Paleo, SCD, Vegan, Dairy-Free)

I am taking a break from my regular Monday baking frenzy to share this super simple ice cream recipe with you.  Well, if I’m being honest, I should say that I was really just taking a break to eat some ice cream.  But when I sat down, I saw that “The New Adventures of Old Christine” was on, and my baking motivation started to waver.

This ice cream is quick and easy, and was inspired by a 39 cent/lb banana sale at Piggly Wiggly.  Which means once I’m done with this blog post, I have to get back in the kitchen and make some banana blueberry muffins.

Banana Almond Butter Ice Cream

3 ripe bananas, mashed

1 cup almond butter

1 can full fat coconut milk

1/4 cup honey

2 tsp. vanilla extract

Combine all ingredients with a hand mixer, and then transfer it to your ice cream maker.

march 4, 2012 027

After about 15-20 minutes in the ice cream maker, I put it in the freezer overnight.  And today the texture (not to mention the taste) was perfection!

march 4, 2012 031

Can’t wait to give some to the kids when they get home from school!